Motorhome advice: How to add a 12V socket to your motorhome or campervan

Our campervan is based on a 1986 Volkswagen T25. Vee Dub, in its 1980s wisdom, cut a corner during our van’s construction and didn’t fit a 12V socket. So I decided to fit one – a job that is fairly simple: find the source of the electricity you wish to use for the socket, find a home for the socket and then connect point A to point B.

The first thing into the basket was the 12V socket as they only had one type in stock. It is a functional thing with a built-in light and a cheerful green surround. Selecting the wire required a little research, which revealed some wire amp rating recommendations. Coupled with a little knowledge I selected a fuseholder. I also picked up a four-way terminal for the positive battery post to give me an extra space for the new socket on the battery.
Disconnect the battery
First, I disconnected the vehicle battery. If you are fitting the socket to a leisure battery, disconnect that one, too.
I decided to fit the socket into the useless ashtray in the cab. This places it close to the windscreen, which is handy for sat-navs. It also allowed me to avoid the task of trying to cut the metal dashboard.
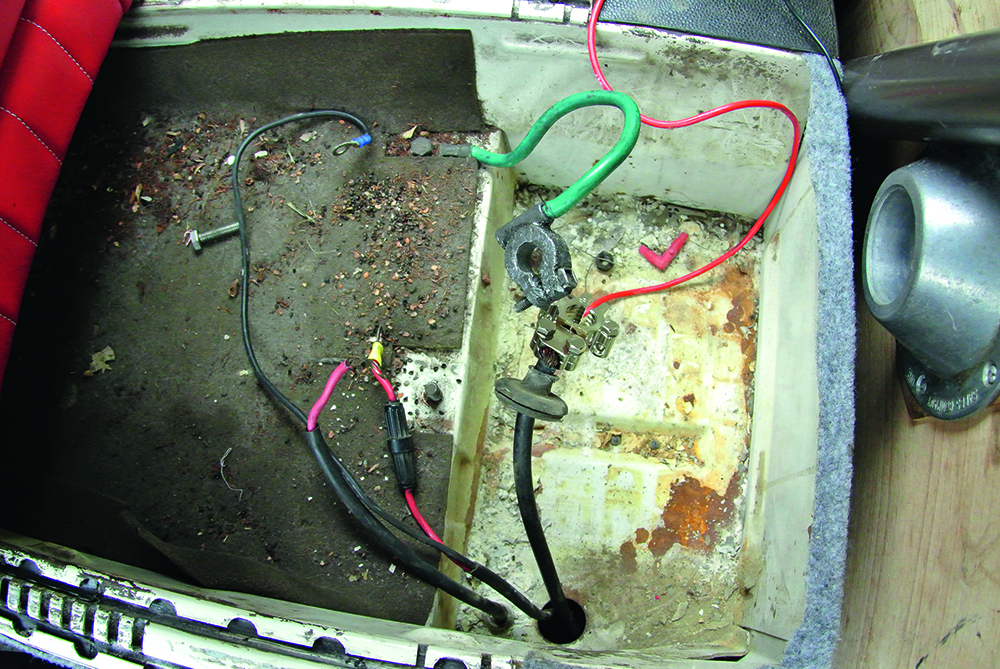
Prior to cutting or drilling anything, I checked the area underneath to make sure it had clearance for the wiring and I could route the wires through the dashboard without having to remove it. In our ’van, the vehicle battery is under the driver’s seat, which makes things easier, as the cables can be routed under the flooring without having to go through the firewall or any panels.
Battery connections
I decided on a direct connection to the vehicle battery for a few reasons. First, it kept the install simple, and, second, it meant I kept my tinkering away from the rat’s nest that is VW’s wiring loom. It also stops my new addition being the source of problems with other electrical systems.
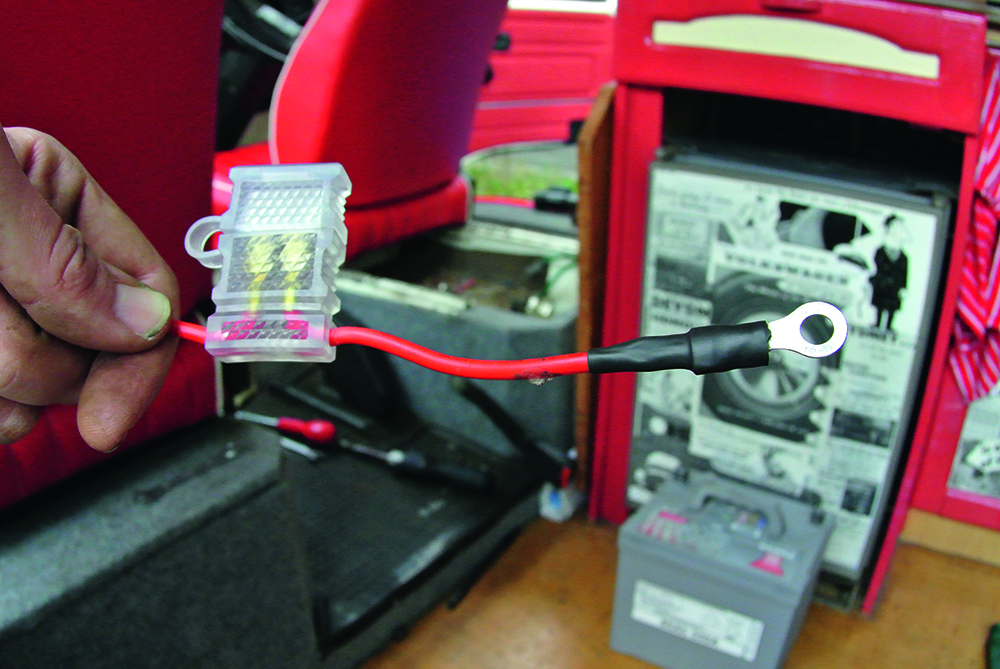
To start, I laid out the cable from the reel from the install point along the route to the battery terminals and cut it to give me the desired length for all the wires in the circuit. Then I stripped the ends off the cables, slipped some heat shrink tubing over the ends and crimped female spade connectors to connect the wires to the new socket.
With the spade connectors crimped on, I slipped the tubing back over the metal of the spade connectors and shrank it down to tidy up the connections before pushing the spades onto the socket. I did the same for the other end of the negative terminal at the battery end, replacing the spade connector for an eyelet connector and bolting it in place to the battery post terminal.
Always fit a fuse!
With half the circuit in place, I turned to the positive connection to the battery. It is important to wire in a fuse on the positive wire. This needs to be situated as close to the battery terminal as possible. I used a wire capable of carrying up to 17A, but a fuse that will blow at 15A (research suggested this was the best option). I used an inline fuseholder and attached it by crimping spade connectors to the appropriate ends. I dressed the connections with heat shrink tubing to protect the bare metal of the spade connector, but you could also use insulated terminals.
If your soldering skills are fantastic you can add the fuseholder by splicing and soldering the wires together. My soldering skills leave much to be desired, so I find that spade connectors are clean, secure and easy to remove and redo if things go wrong. But remember to cover any exposed metal with heat shrink tubing or electrical tape.
An inexplicable short circuit (especially one that occurs when exposed connections find other exposed connections) is a good way to cost yourself a lot of fuses. The circuit is earthed on the vehicle battery, which is costly in terms of the extra wire but it’s easier than crawling under the dashboard and finding some exposed metal nearby to earth the socket onto.
Testing the circuit
With everything wired together and the battery wires attached to the battery temporarily, I set my multimeter to DC volts and put the probes on the correct wires at the socket points and saw 12V was showing on the multimeter. Success!
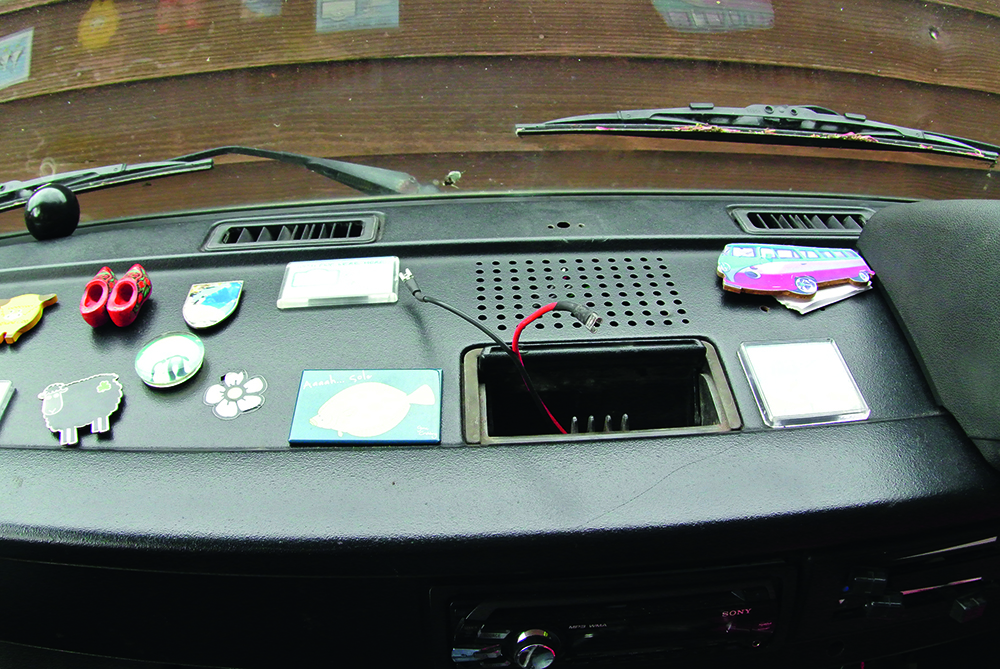
I also tested the air around the wiring to check for visible smoke and a smell of burning plastic. There was none, so I moved onto the final phase. To fit the socket into its new home, I drilled a hole in the lid of the ashtray and slotted the socket in. It is quite secure and fits flush with the top. The only downside is the ashtray won’t open again (but we don’t need it).
Now in its new home, I routed the cable back along the cab floor underneath the floormats to the battery. The wires were secured in place with tape during the fitting and the battery wires were connected to the correct terminals. With the cable route planned, the cable is slotted inside protective plastic sheathing to protect it from general chafing and my size 12 clodhoppers.

After only a couple of hours I was all connected up and ready to start charging things, using a sat-nav and boiling a 12V travel kettle. You can apply this same process to add an additional 12V socket to your ’van’s leisure battery almost anywhere, as the principles are pretty much identical.


