Motorhome advice: Fitting solar panels to a coachbuilt motorhome

Having decided to equip my Carthago for wild camping, my first job was to choose and fit solar panels. When it comes to choosing the size of panel, the usual limitations are cost and the available roof area.
It should be remembered that the quoted wattage for solar panels can only be achieved on a sunny day with the sun high in the sky.
This means that even very large panels are going to struggle on a cloudy winter’s day when the combination of sun angle, daylight time and cloud cover all reduce solar output. So, don’t underestimate the size of panel required.
A solar regulator with an additional dedicated output can also keep the starter battery topped up once the habitation battery is fully charged, avoiding the need for an extra panel and controller.
I decided to initially go for a pair of 130W panels. This was within my budget and made the most of the allocated roof space. If I later decide that more wattage is required it also leaves sufficient roof space to add further panels.
Useable roof space for solar panels
Having come up with a desired power output, a plan of the motorhome roof was required to determine the size and shape of the panels. On most motorhomes the roof already has many projections such as skylights and vents, which limit the useable roof area.
In my case (a 7m A-class) there were two separate areas both capable of accommodating the 260W panel area that I had chosen. I therefore chose the one closest to the fridge roof vent to avoid drilling a hole in the roof for wiring.
Solar panel choice
Solar panels come in two main types; flexible/semi-flexible and rigid frame mounted. The flexible ones in particular (and semi-flexible to an extent) are not as well protected from damage and are likely to fail if not installed with great care.
The potential problems start with mishandling before and during fitting when the panels are most vulnerable.
The other problem is that, as they are stuck directly to the roof, they tend to heat up significantly during hot weather. Any air gaps under the panel can expand with heat flexing the panel causing any micro cracks to grow. In extreme cases, or with poorer quality panels, this can overheat or corrode the soldered joints in the panel.
Also be aware that the hotter the panel gets the less power it produces. In colder weather there is always the concern that water will find its way past the adhesive seal and freeze, which will also cause flexing. Panel replacement is not straightforward.
Rigid panels overcome these disadvantages but at a significant weight penalty and, because the panels are on the roof, they also raise the centre of gravity of the vehicle.
To see how significant the weight difference was I checked the specification sheets for 130W panels. A semi-flexible panel weighs about 2.5kg, whereas rigid ones weigh between 8.5kg and 11.5kg. For two 130W panels this is a difference of 12 to 18kg, which is quite a weight penalty, so I looked for a way to give the semi-flexible panels a rigid but lightweight frame.
I chose back contact-type panels with an ETFE coating. These produce the same power and yet are smaller.
Custom Frame
The vendor emphasised the importance of fully supporting a semi-flexible panel if it isn’t going to be mounted directly to the roof. The panels can be drilled provided that the holes are no nearer than 8mm from the solar segments. This was achieved by drilling 6mm holes (1/8-inch initially for temporary fixing using cleco temporary fastners) 13mm from the panel edge every other gap between the segments.
Final fixing used 5mm stainless machine screws with stainless rubber-backed roofing washers with threads tapped into the frame. The final panel holes were oversize to allow for contraction and expansion. This way of mounting allows easy panel removal later if necessary.
The frame was made of four crossbeams of U-channel aluminium (38mm width x 25mm deep x 3mm thick) and two siderails of aluminium angle (38mm wide x 12mm deep x 3mm thick). Eight small pieces of 80mm long x 38mm wide x 3mm thick aluminium strip link the pieces together at the underside of the joints enabling a totally flat upper surface for panel attachment. To join all the pieces together I used 4mm rivets.
Before assembly, lightening holes were drilled using a stepper drill, cutting 20mm holes for all the 38mm faces and 12mm holes along the narrow side of each U-channel. Be careful to space the holes to avoid positions for rivets and panel fixing.
The frame was already quite rigid before fixing to the roof and weighed about 2.5kg. It can be sprayed with etch primer and white spray paint or, if the budget allows, powder coated.
The outline of the cross beams was marked out on the roof and the surface sanded. Final fitting is best done with the panel and frame assembled. Sikaflex was applied to both the roof and the underside of the four cross beams.
The panel/frame assembly was then lowered onto the roof and pushed gently down to ensure the Sikaflex was well distributed. The edges of the lightening holes added extra gripping power for the Sikaflex. The combined semi-flexible panel and frame weighed 5kg. This means that, for a pair of 130W panels, my weight saving was around 13kg over rigid panels. The panels are also well ventilated for optimal performance.
Choosing a solar controller
MPPT solar controllers seemed to be best suited for our type of application.
As part of the panel’s job is to keep the batteries topped up during periods of inactivity, I opted for a controller that automatically tops up the starter battery after fully charging the habitation battery. I used a Votronic 350W 12V dual-battery MPPT regulator from Phototonic Universe for £156.99. Do ensure that the capability of the controller well exceeds the maximum panel output and, to minimise cable losses, place it close to the habitation battery.
If you plan to add another panel later, it might be worth spending the extra and buying the higher-rated controller in advance. However, there comes a point with higher power outputs where two medium-rated controllers are less expensive than a single high-power controller.
Choice of cable
The best wire is twin-core multi-stranded flexible cable (many solar panel retailers sell extended wiring kits, too). The size of the cable is dictated by its ability to deliver current flow without heating up excessively.
For solar panels it is power transfer that is important, so a much larger size is required. This is particularly important over long cable runs and if large output panels are used. A 6mm² cable is suitable for most applications and there is a useful website to help with this.
Useful contacts
Photonic Universe
Photonicuniverse.com
Wiring specifications
Solarpanelsvenue.com/calculator/wire-sizing-calculator/wire-sizing-calculator.htm
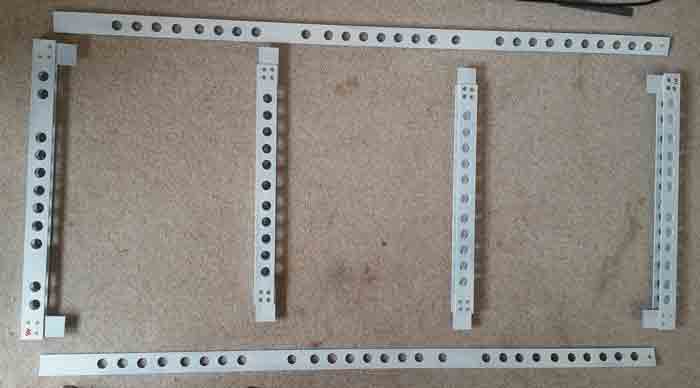
1. A custom frame was made from aluminium U-channel and aluminium angle, secured with stainless steel fixings and drilled with holes for extra lightness.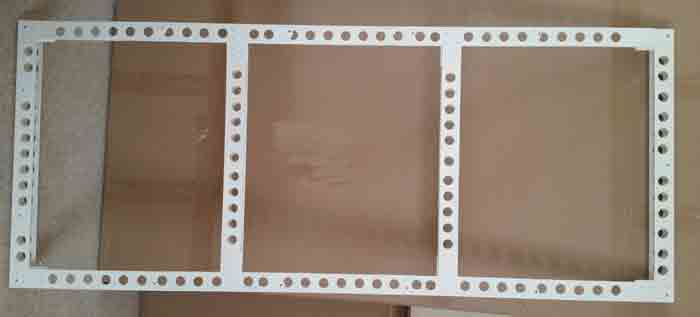
2. After riveting the frame together, it was etch-primed and sprayed with a white gloss paint. You could also powder coat it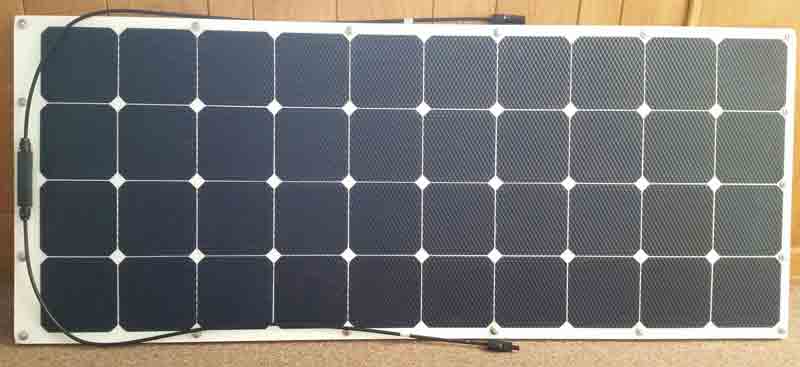
3. The semi-flexible solar panel was attached to the aluminium frame using roofing fixings
4.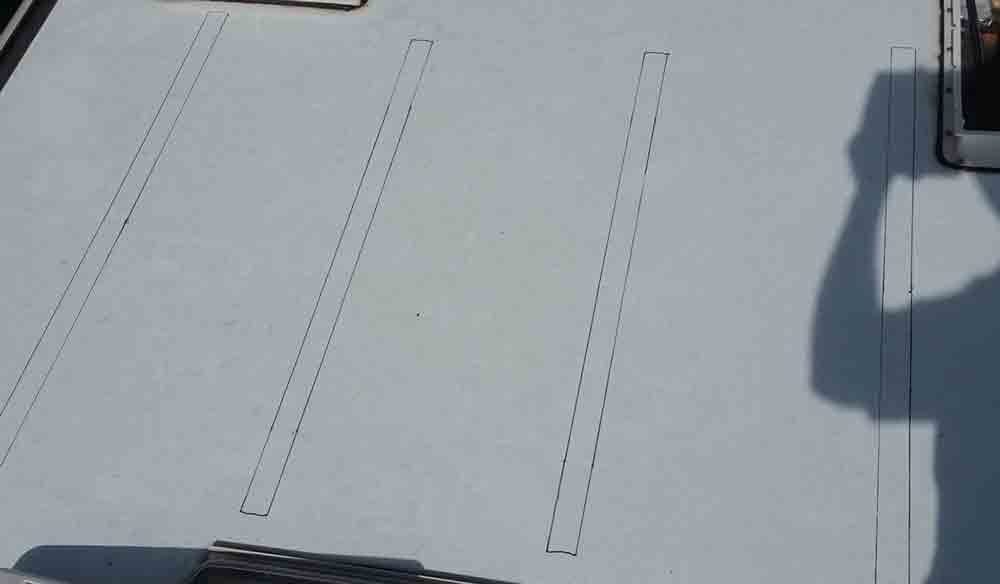
4. The position of the frame was carefully marked on the roof prior to the final fit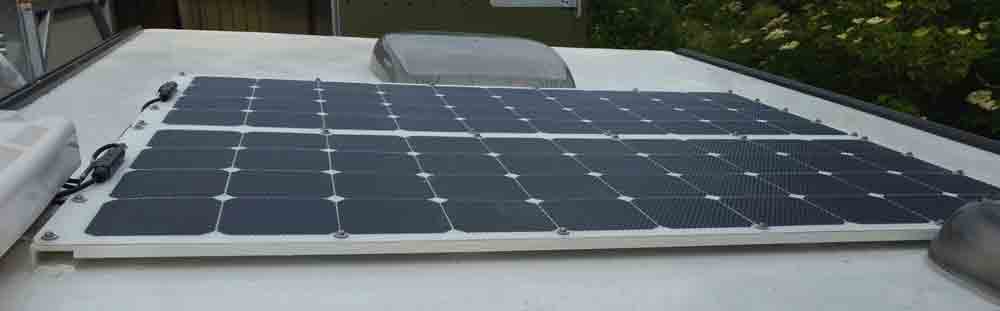
5. The key reason for building the frame was to create this air gap underneath to keep the panels as cool as possible for increased efficiency
Read MMM magazine every month for more practical advice and technical projects - subscribe here, and browse our online articles here.


