Motorhome advice: Fitting a gas tank and heater to a campervan

Words and photos: Andrew and Rona Bromley
When converting a small campervan for use in British weather, you usually need a heater. The simplest and cheapest solution is a small, mains-powered, electric fan heater, or a quiet and safe oil-filled radiator – either of these works a treat if you’re staying on a campsite with an electric hook-up.
However, if you’re an intrepid off-grid camper (but likes creature comforts, even if only for drying soggy hiking socks!) other options need to be explored – and none of these come cheap.
The Truma Combi (4kW or 6kW), either gas-powered or with mains-electric option, is pretty standard on coachbuilts and works well, but occupies too much space in a small campervan, so converters generally choose a diesel-powered heater – usually either Webasto or Eberspächer.
Most are just blown-air heaters, but some versions also heat water. That leaves only the campervan’s cooker using gas, generally from small replaceable cylinders stored in a dedicated locker.
Alternatively, you could go upmarket, remove gas from your camper altogether, and fit a Wallas XC Duo diesel-fired cooker, which doubles as the heater.
Diesel or gas?
Most campervans we’ve owned have had diesel heaters and we were never particularly impressed.
In our experience, noise levels are relatively high (especially externally); particulates are blown into the air around the (static) campervan; and the occasional whiff of burnt diesel tends to percolate the interior. We know you’re always told that doesn’t/can’t happen but, in our experience, it always seems to.
They also consume considerable leisure battery power, especially on start-up. We decided against the Wallas, having read of slow heating-up of the cooking facilities, and warm air blown out at midriff height (we prefer warm toes – and hot air rises!). And, of course, it’s another diesel, so the exhaust (externally), would still be mucky/smelly.
When having a bespoke campervan converted, we were free to choose our own heating system. Whilst we do normally stay on site, and use a mains-powered fan heater, clearly something extra was required for occasional use off-site.
We wanted something small, simple and cost-effective, with cleaner/smell-free exhaust; and, as we use gas for cooking, we decided we’d use it for heating, too.
LPG lovers
We chose the Propex HS2000 system, a compact blown-air heater, which normally fits inside the campervan in the driver’s seat-box.
However, we wanted an external mounting to reduce noise inside. We also specified an (optional), 60mm-diameter acoustic tube from Propex, which, according to tests run by the company, reduces the heater noise from 65dB to 55dB.
The HS2000 is small enough to fit the cluttered underside of a short-wheelbase VW T6, whereas we understand the Propex HS2000E, with mains-electric option, is too big and would need to be located inside the campervan.
Propex heaters use more fuel than the equivalent diesel heater and, if you were running one from those ruinously expensive exchangeable gas cylinders, it would be uneconomic.
However, when mated to an underslung 15-litre gas-tank (supplied as part of a kit by Propex), a 12-litre (80% full) tank should give about 42.25 hours heating (but no cooking).
At current prices (12 litres x £0.67 per litre = £8.04 ÷ 42.25 hours = £0.19 per hour), that’s an equation we can live with!
Moreover, we’d save the space normally used for carrying gas canisters within the campervan.
We consulted comparative technical specifications for Webasto, Wallas and Propex, taken from the respective websites, to help others in the same quandary make up their minds.
Once the decision was made, we checked with Nu Venture that the system would fit our conversion and, when this was confirmed, we ordered the kit from Propex.
We didn’t fit the system ourselves (we aren’t qualified and wouldn’t dare!), so what follows is necessarily an overview.
Moreover, Propex is reluctant to supply private individuals with its fitting kit (though the heater itself is readily available), as it understandably prefers for the fitting work to be carried out by reputable and professional converters.
The company also offers a fitting service at its headquarters at Ringwood in Hampshire, and is extending its dealership countrywide.
The fitting operation takes a half-day and the final cost of the HS2000 and 15-litre tank, fitted by Propex’s engineers, is £1,275 so, for those who need a gas certificate and also the peace of mind afterwards, we would suggest this could work out to be a worthwhile trip.
Stage 1 – Fitting the heater
The first step is to fit the main heater box. This involves unbolting and removing the driver’s seat and the undertray below, and then attaching the bracket that is used to hold the heater in place.
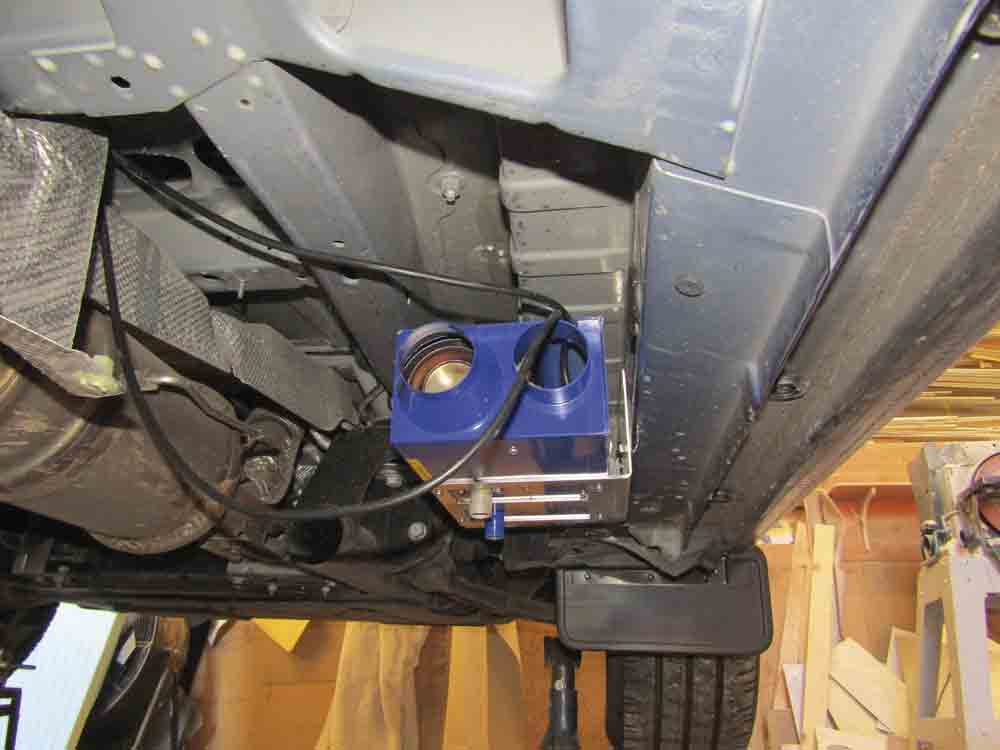
To do this, you need to remove the forward plastic bung on the inner sill and fit the bracket using the supplied retainer and self-tapping screws, then slide the heater into the bracket and screw it into place.
Next, you need to drill two 67mm holes into the van floor under the driver’s seat, alongside the existing grommetted hole and treat the edges with rust-proofer.
The ducting pipes are then threaded through these holes and attached to the heater.
Nu Venture actually cladded the external section of the vulnerable sound-deadening hose with an 80mm alloy sleeve (which can be seen as the paler tube in the pictures).
The inlet hose is then attached to the front of the seatbox and the outlet to the rear, into the habitation area.
For both vents, Nu Venture also made carpet-covered, ply seat-box panels to replace the moulded plastic VW originals.
Elbows are fitted to the combustion-air inlet and exhaust points on the heater, and the black pipe fitted to the inlet, with the stainless-steel pipe fitted to the exhaust. These are run to the sides of the van, pointing backwards and slightly down, at least 500mm apart, and secured with hose clamps screwed to the sills.
To finish off Nu Venture ran the thermostat and power tails from the heater up though the grommetted hole under the driver’s seat.
Stage 2 – Fitting and connecting the gas tank
The fitting of the gas tank is much easier if you have a ramp – otherwise it is really a three-man job... and with much cursing!
The gas tank is attached to a structural cross-member of the van’s chassis. It is fitted sideways in front of the spare wheel using the supplied stainless-steel cradle and rivet nuts.
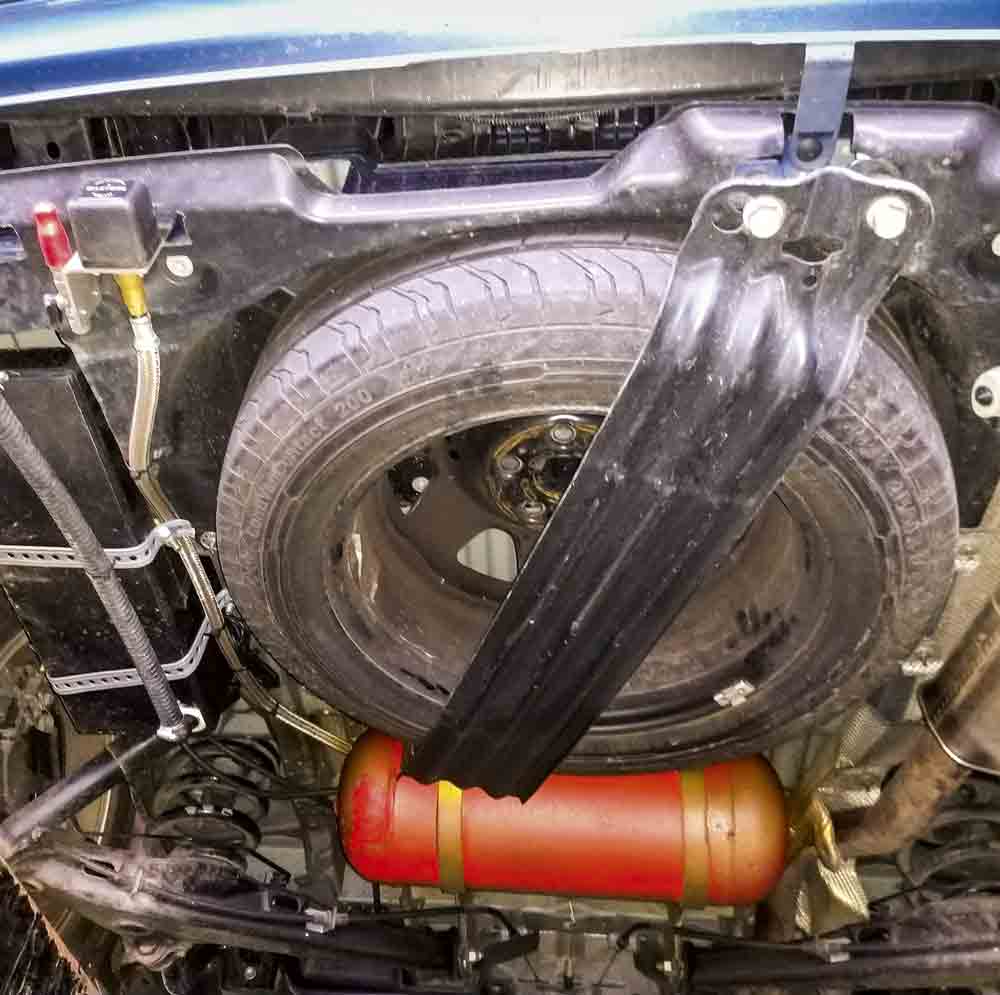
The gas tank already has a control regulator attached – this could be used to switch off the gas to satisfy the Channel Tunnel operators or any ferry operators, but would be hard to access. However it is not necessary (see below).
The gas elbow is attached to the rear of the heater and a hole drilled through the floor under the kitchen.
A three-branch manifold is then installed (taps for gas supply, heater and hob) and the pipe connected to the elbow.
The stainless-steel flexible filler pipe is then run past the spare wheel to the rear of the campervan, under the back bumper and secured.

Stage 3 – Electrics
The wiring loom is fed up the driver’s B-pillar to the heater control panel and thermostat, taking a 12V lead located under the driver’s seat to the top of the heater. This is connected to the leisure battery, via the vehicle’s main control panel.
Finally, a wire in the supplied gas-level gauge and control is given a direct feed from the leisure battery. This gas control has an on/off switch, which can be used to isolate the gas tank completely – as required in the Channel Tunnel.
The project details
What we spent
Total cost was £1,275 fitted, including the installation of an underslung 15-litre gas tank.
How long it took
The professional fitting took half a day.
Project summary
The Propex heater has a single 1.9kW heating operation, plus a fan-only setting for cooling the campervan. Originally, it was controlled by a simple rotary dial, but we’ve had it replaced by Propex’s new digital thermostat control. A cost-effective option (available either in the kit or for aftermarket fitting), this provides more precise temperature control, plus a timer.
The interior of our small campervan is quickly warmed, even from the single vent, and the Propex is relatively quiet – certainly quieter than our mains electric fan heater, and the Webasto and Eberspächer diesel heaters we’ve had before. It’s economical, too. It’s worth noting that the fitting kit includes a gas BBQ point.


