Motorhome advice: 5 DIY projects to improve your motorhome or campervan

Surely, part of the enjoyment of owning a motorhome or campervan is the opportunity to tinker about with it, isn't it?
There are likely to be aspects of your motorhome that you'd like to improve, whether that be in terms of performance or appearance. There are plenty of DIY projects you can undertake, and we've featured many of them in the pages of MMM each and every month. Here are five DIY projects to improve your motorhome - or campervan - that may be of interest.
From quick jobs that you will be able to complete on a Saturday morning to more intensive projects that take a good deal longer - such as building furniture for a self-build campervan - these five DIY projects will certainly keep you busy!
If you have any questions or queries about issues concerning your motorhome, get in contact with MMM's Technical Team by emailing [email protected]
Creating furniture for a self-build campervan
Words and pictures by Ian Pedley
As part of a self-build campervan project with a friend, Ian Pedley planned and created furniture for the ’van. Here, he gives an insight into how he approached the first stages of the project…
As part of helping with the build of my friends’ (John and Maeve), van conversion, I helped with the design of the furniture. At the time, the van had to go back to the dealership to have a replacement EGR valve fitted, so we used this two-week pause to play around with the design.
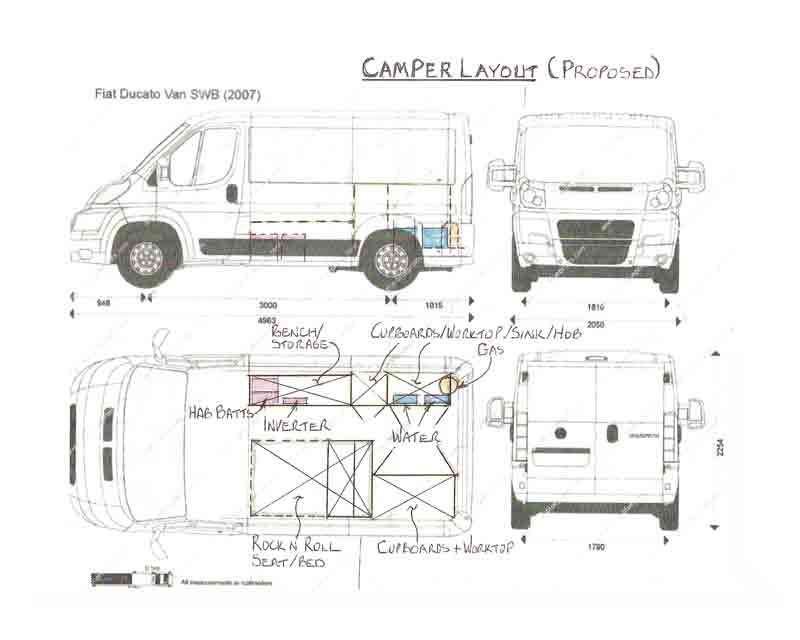
This involved cutting bits of paper out (to scale) to represent the items of furniture and placing them on a plan view of the van. This quickly showed us that with a vehicle of this size, every inch was precious. It was around this time that we decided to go for a full-scale mock-up of the internal furniture out of cardboard.
We reasoned that it was far easier to make a full-scale mock-up with some cardboard rather than a full-scale cock-up with the expensive flatpack unit.
We did some weight calculations and decided that, with a one-tonne payload, weight wasn’t going to be an issue with this campervan. This left the door open to utilising standard low-cost kitchen flatpack units.
Making cardboard mock-ups
The cardboard mock-ups were well worth the time and effort and ended up saving a lot of time and money.
It’s difficult to get the feel for the actual space working from a drawing, especially when trying to convey the ideas to other people. What appeared to look OK on the drawing was rejected when it was seen in the (cardboard) flesh because it made the rear of the van look too claustrophobic.
We had planned to keep the cupboard heights full height on the nearside, but only waist height on the offside. A bench seat sat opposite the sliding door.
The cardboard had been cut to the appropriate sizes and stuck into shape with the aid of some trusty duct tape. This showed up the rear area to be a bit overbearing, especially as the rooflight had yet to be fitted, so we quickly modified the full-height cupboards to waist-height cupboards.
These were modified in minutes with the aid of some scissors... and more duct tape!
By using the cardboard, little things like the access to the internal fittings for the rear road lights (for bulb changing, etc) showed up instantly.
The consequences would have been disastrous if we had fitted the real units but, as it was, we’d modified it in minutes.
Building the real furniture for the campervan
Once the design had been finalised, we started work on building the actual furniture. On the nearside, two B&Q flatpack base units were built to create a storage locker and roughly positioned.

On the nearside rear, we built a freestanding kitchen unit that will contain the gas locker and removable water tanks for fresh and waste water. The worktop will be inset with a Smev single-burner gas hob and a sink unit.
In the lounge area, the seat box was built out of laminated boarding, wooden battens and plywood. The base of the bench seat houses the mains electrical systems and the battery charger as well as the batteries themselves.
The project is ongoing and we’ll aim to update on progress in the future…
What was learnt: A one-tonne payload allows you to use cost-effective flatpack kitchen furniture
What was spent: £260 on batteries, plus about £100 on a kitchen flatpack and £130 on a Smev sink
How long the project took: Several weeks – and more
This article was originally published in the May 2018 edition of MMM magazine. To read it in full, buy a digital back issue copy here.
Improving the radio reception in your motorhome
Words and pictures by Colin Maslen
Frustrated by a poor, intermittent service, Colin Maslen helps to improve the quality of his radio reception by fitting an aerial extension lead…
 Some of you with Ducato/Boxer ’vans may have found a problem with radio reception. Or lack of it. Mine is dreadful in Elvis, my 2017 Elddis motorhome. It’s forever wandering off station and is really crackly at the best of times.
I considered fitting an aerial booster but, before doing so, I asked for advice on MMM’s forum. It was recommended that I try a separate lead from the built-in TV aerial and running a new cable to the radio.
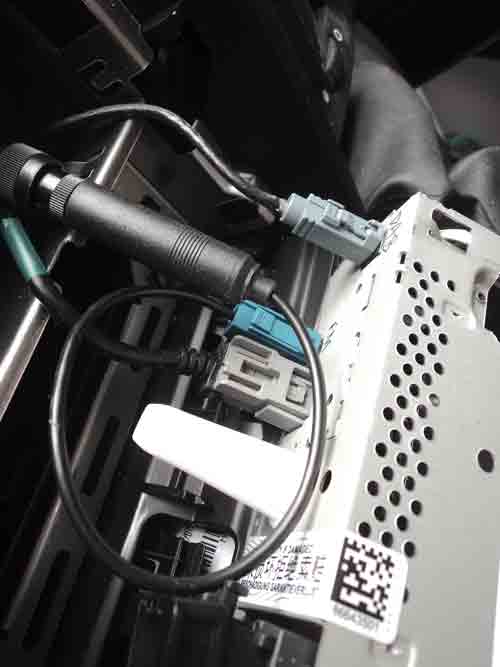
Looking in the wardrobe, where the aerial comes through the roof, there’s an amplifier and a connector box. The box has three outlets marked TV1, TV2 and RAD 10. Now, it doesn’t take a genius to work out that RAD 10 could also mean radio, so I bought a 10m aerial lead from Maplin and a new connector for the back of the radio and plugged it all in.
A big job was hiding the cable from the wardrobe to the front of the ’van and getting it up to the radio, but with a little help, we managed.
It was a faff, feeding it behind the dash, around the steering wheel and under the seats and furniture and taking bits off to hide it. What started as a 10-minute job, as usual, turned into at least half a day.
Behind the radio, there’s also a grey connector for DAB radio – I’m not a fan of DAB so I left that alone.
One point worth making is about radio codes. When I took the radio out the first time and disconnected the cables, I put it all back 10 minutes later and it was all working OK.
However, the second time I did it I left it out overnight and, when I put it back in the next day, I got a message on the screen saying ‘Code Input Error Restart System’.
The radio manual contained the radio code, but none of the buttons on the radio would take me to this infamous ‘Code Input’ page.
So back to MMM’s brilliant forum and somebody suggested just leaving the radio switched on for half-an-hour and the radio talks to the van’s ECU and it should reset itself. It worked!
I’d also like to make a mention on how to get the radio out. You’ll see there are four small 2mm holes in the radio fascia. You need a radio removal kit (from online or outlets like Halfords), which is two U-shaped tools, the ends of which you insert into the holes. Alternatively, you can use four fairly substantial small screwdrivers and push them in about an inch and you’ll feel some resistance as the tags inside push away. Give the screwdrivers a good wiggle and the radio will come out.
Don’t be too gentle with this - the screwdrivers need a good tug. It doesn’t matter what type of screwdrivers you use, you’re just using them to push the tag to one side.
Whatever you do, do not try to lever it out with a screwdriver from under the fascia. The radio reception seems better now, but the proof will come when we’re out and about.
What was learnt: DIY projects can be easier than you think
What was spent: The 10-metre aerial lead cost about £10
How long it took: The radio lead took half a day to fit thanks to having to hide the lead behind the trim
This article was originally published in the Summer 2018 edition of MMM magazine. To buy a digital back issue copy of that edition, click here.
Improve the comfort of your motorhome bed
Words and pictures by James Turner
No-one likes an uncomfortable bed in a campervan – and so James Turner set about improving the quality of his night’s sleep.
One of the features that attracted us to our Challenger Genesis 190 while in France (it’s the same as a Chausson 510, but not sold in the UK) was the drop-down double bed over the lounge. This layout provides a large table and daytime space, keeping the overall length down.
 At bedtime, the table’s lowered electrically into the footwell, then the bed is lowered (also electrically) from its position in the roof, settling just above settee height, so providing easy access for the not-so-young.
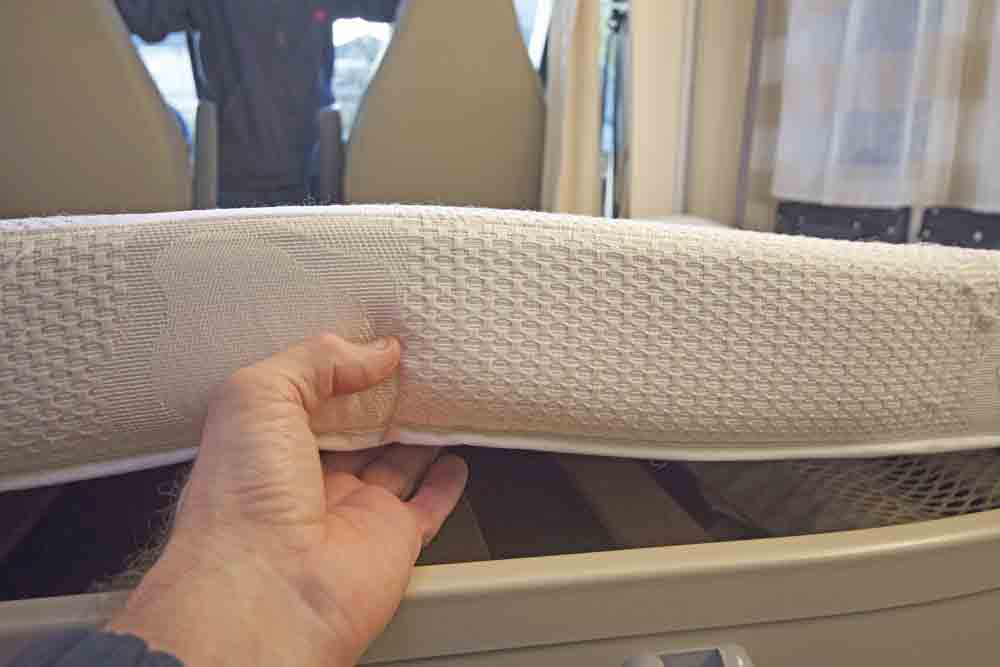
The drawback, when compared to ’vans with a fixed bed, is that the mattress isn’t very thick, and you can feel the wooden battens when you lie down. We thought of changing the mattress for a thicker one, but the problem is that when the bed is stowed away in its raised daytime mode, it would be too low.
The hunt was on for something that would significantly improve comfort, but at the same time wasn’t so thick as to adversely affect the ceiling height.
Browsing around the Southampton Boat Show last year I spotted an under-mattress addition called Dry-Mat from Shipshape World.
Dry-Mat’s main purpose is to reduce condensation that collects under boat mattresses, where there’s often an enclosed space. This may be a benefit if you have a fixed bed over an enclosed locker but, for our camper, where the bed is out in the open, condensation isn’t an issue.
What attracted me to try Dry-Mat was the demonstration by the salesman of how weight is spread across a large area, far more effectively than slats. Indeed, in some racing yachts, where weight is at a premium, sailors sleep on two layers of Dry-Mat, with no mattress at all.

Dry-Mat is a 10mm thick layer of thousands of individual micro-springs that allow air to circulate between your mattress and bed base. I thought it was worth a try, so parted with my £60 and got busy installing it – which was a piece of cake.
It took around 10 minutes to fit Dry-Mat. The first test was a month-long tour of France and Spain in January. The difference in comfort is, well, huge. Prior to fitting it, the bed was OK, but I often got uncomfortable in the night.
Adding Dry-Mat has made a real difference. You can no longer feel any of the battens. Being only 10mm think, you don’t notice the difference in the stowed position of the bed.

Would I recommend Dry-Mat? Certainly. Indeed, I wouldn’t want to ever be without it in our camper.
This article was originally published in the Summer 2018 edition of MMM magazine. To buy a digital back issue copy, click here.
Improve power capacity - Fit twin high capacity batteries
Words and pictures by Neal Morris
Power capacity can be an issue for motorhomers. To maintain a consistent level of energy, Neal Morris fitted twin high capacity batteries to his Swift Rio.
All motorhomes have limited off-grid power capacity, which can leave the owner short of energy, particularly when power-hungry equipment is being used. This is especially true for those of us who want to use additional electrical items via a mains inverter, such as a microwave or a hairdryer.
I often use our Swift Rio for short overnight breaks and find myself requiring use of the microwave or a fast brew with the electric kettle, so I installed a hefty low-frequency, pure sine wave inverter.
My inverter calls for significant power demands, typically 100A for several minutes when using the microwave and I need to continue to power everything else, including the lights, television and satellite dish (and the PS4 games console when my son is resident).
It was clear I was going to need a battery set-up that provides an excellent high-current performance, uncompromised life.
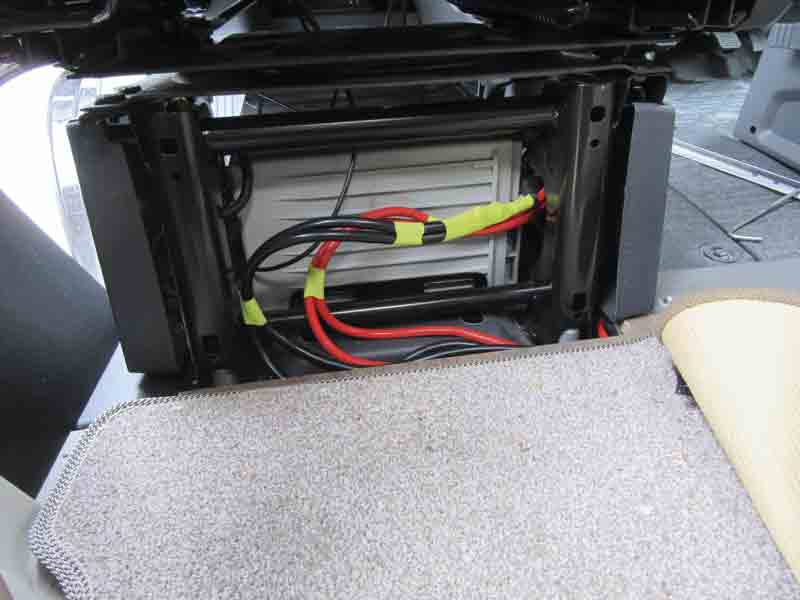
My Swift Rio was equipped with a solar panel and an excellent Yuasa 80Ah battery mounted sideways under the driver’s seat.
The passenger seat has the same volume beneath, but Fiat has put the spare wheel jack/tool kit here.
This can easily be removed (to stow elsewhere in the habitation area), leaving space for a second leisure battery if required.
I looked at what was available and there’s a bewildering range of battery technologies. The best batteries on paper seem to be lithium iron phosphate (LiFePO4) models but these would not work efficiently with Swift’s existing smart charger and solar panel. In addition, the overall cost of buying lithium and dealing with the present charging system would easily exceed £2,000.
Several hours of research later, I discovered an interesting range of leisure batteries manufactured by Victron Energy.
Victron has a series of so-called AGM Super Cycle leisure batteries and it just so happens that the 170Ah one (model BAT412117081) fits sideways under modern Ducato cab seats – it’s uncanny and almost as if they were designed for them.
Since they use sealed AGM technology, there are no safety ventilation and orientation considerations, either.
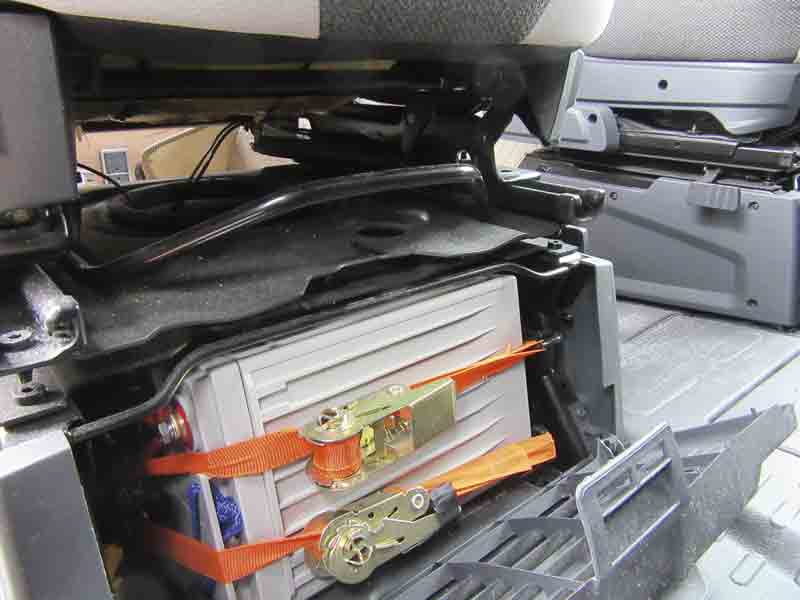
I ordered two of these from an authorised Victron supplier (around £350 each including VAT and delivery) to fit under both seats, to give a total capacity of 340Ah. As each battery weighs 45kg, get help to lift them into the cab.
You also need to take this extra weight into account by deducting it from your payload (minus the weight of the original Swift battery).
I do not intend to run the Victron batteries beyond a 60% discharge and expect to be using the motorhome off-grid at least twice a week, every week. The total cost of this project was under £800.
That’s a tidy sum, but still a fraction of the cost of a lithium set-up and it will be interesting to revisit the matter in five years’ time to compare battery technologies and their costs.
Future planned developments to the present set-up will also include a 60A battery-to-battery charger and some modifications to the original Sargent control box to disable the joint alternator charging.
Tools needed to fit twin high capacity batteries in a motorhome:
- Soldering iron
- Wire cutters
- Adjustable spanner
- Heat gun
- Two 170Ah Victron Super Cycle AGM leisure batteries (£350 each – look online for best prices)
- Heat shrink tubing to suit (bought from eBay)
- Two-gauge red/black copper wire of at least four metres (eBay or Halfords)
- 150A fuses (from eBay or Halfords)
- Battery terminal solder rings (from eBay or Halfords)
- Heavy duty ratchet straps (from eBay or Halfords)
This article was orignally published in the August 2018 edition of MMM magazine - click here to buy a digital back issue copy.
Upgrading the horn in a motorhome
Words and pictures by George Vince
A quiet beep is hardly fitting for a substantial vehicle such as a motorhome. George Vince resolved to upgrade the horn on his Mk 3 Ducato to a more powerful version.
The majority of motorhomes, irrespective of size, seem to have a single tone ‘beep-beep-style’ electrical horn warning system as an original fitment. Adequate, I suppose, but hardly befitting the majesty and splendour of what is probably the second, next to our home, most expensive purchase in our life. How many times have you been in a situation where a good blast on a horn would fit the bill only to find that the best you can muster is a feeble beep?
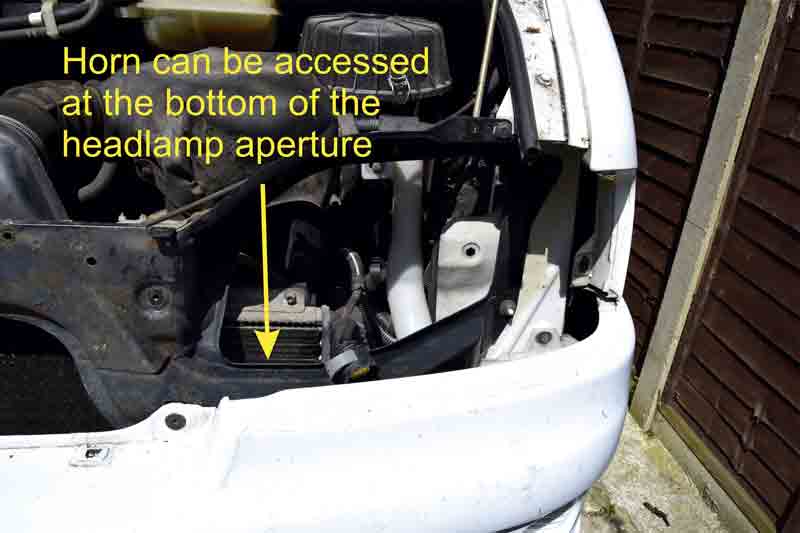
This project outlines the fitting of a two-tone, compressor-driven pair of horns, which have an output of over 120dB. There are a number of air-horn kits on the market ranging from the variant I chose (two horns each with a different pitch) progressing upwards to five or more horns and sophisticated compressors to suit that will play Dixie or La Cucaracha if required (both of which are illegal by the way, as sequential tone horns are only allowed to be used by the emergency services). As there is restricted space under the bonnet more than two horns would have been too much of a squeeze.
The approach taken allows us, at the flick of a switch, to revert back to the original beep-beep horn.
This is handy for such occasions as being in a built-up area when a loud melodic blast could be deemed inappropriate, or where a two-tone blast could result in an unpleasant road rage confrontation!
This project outlines the fitting of the air-horn to a Mk3 Fiat Ducato and the approach taken relates to that vehicle. However, the layout of motorhomes under the bonnet (where the system should be housed) varies widely so the actual physical location of components and bracketry pertaining thereto will need to be derived accordingly by the installer.
The basic approach, however, (electrical wiring, etc) will remain the same. Points to watch out for:
1. Make sure that the bonnet, when closed, doesn’t come in contact with the compressor or the horns.
2. Remember, the engine is on anti-vibration mounts and will rock about when running or responding to torque loading when climbing hills, etc, so allowance should be made for this and appropriate clearances given.
3. Mount the horns facing downwards to avoid any water getting trapped in them.
4. Find a place that is protected from the elements as best as possible. A lot of water will be sloshing about while driving in wet conditions.
5. Although not essential, group the component parts as close together as possible. This will cut down on wiring and ease air feed hose routing constraints.
6. It is essential to disconnect the battery negative terminal when connecting the heavy current supply wire to the positive terminal. This removes the reference for the 12V positive and leaves it floating so that, should a spanner touch the chassis during connecting to the 12V positive battery connector, it won’t result in it welding itself to the vehicle and a possible fire.
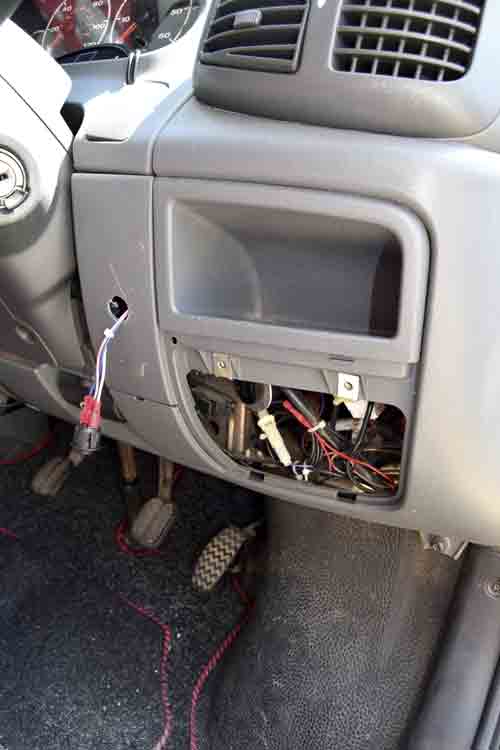
The 12V positive supply to the original horn is diverted to the common terminal of a switch mounted adjacent to the driving position thus supplying 12V to it each time the horn button in the centre of the steering wheel is pushed.
Each of the two output terminals of this switch are connected to one or other of the solenoid (activation) coils of two 40A relays mounted under the bonnet. Each of these relays is fed with an independent high-current 12V supply from the main vehicle battery via a 15A fuse.
One relay is allocated to the air-horn’s compressor and the other goes to the original horn.
With the switch in one position, one of the relays is activated and its respective horn will sound. With the switch in its second position the other horn will sound.
The installer can determine the switch configuration (my switch has a ‘I’ and ‘O’ identifier on the button) by swapping the two output wires over accordingly.
Tools you need to upgrade the horn in your motorhome:
- Air-horn kit of your choice
- 2 x 40A IP65 waterproof SPDT relays
- 1 x 5A-rated fascia single-pole, double-throw switch
- 1 x waterproof fuse carrier and 15A fuse
- 15A and 5A multi-strand wire
- Various space connectors
- Heat-shrink sleeving (various sizes to suit)
- Cable ties (various sizes)
- M8 bolts and M6 coachbolts, plus washers and locking nuts
- Metal for brackets
- Epoxy adhesive
- Conventional took box (screwdrivers, pliers, files, etc)
- Soldering iron, solder, flux, etc, crimp tool, wire strippers, heat gun for heat shrink
- 10mm and 13mm spanners
- Drill and drill bits
What was learnt: A louder horn is much more effective at alerting other road users
What was spent: basic air-horn kits cost under £50 depending on what you buy, plus about another £20 for the wiring and switch
How long it took: About three to do the whole thing but it largely depends on the access to your original horn wiring


