A guide to simple motorhome DIY servicing

Words and photos by Peter Rosenthal, MMM Technical Editor
Modern vehicles are not particularly difficult to service and, while some jobs like swapping a cambelt are best left to experienced DIYers or qualified technicians, there are many servicing tasks that you can do yourself and save money at the same time.
What a service entails depends on mileage and the service schedule in the owner’s manual.
Typically, every couple of years, it will include an oil and filter change, a new air filter and diesel fuel filter and a brake fluid flush.
Other items, such as renewing pollen filters and checking and greasing various items, may also be included.
When your vehicle is still in its manufacturer warranty period, we recommend using a main dealer for servicing.
While it is not essential to do this to maintain your warranty, very few non-franchised garages will have access to the latest software and electronic diagnostic equipment that a main dealer will use.
As part of each service, a main dealer will also use a diagnostic tool and read off any error codes, as well as updating the ECU software as needed.
Plus, if you do need to claim under your warranty, it’s easier to do so when you have a full main dealer service history.
When the manufacturer warranty expires, it’s worth considering your options, including doing the servicing yourself.
This means you just pay for the parts, provided you have a basic set of tools.
Motorhome service intervals
The service schedule should be detailed in your motorhome owner’s manual and there should be a list of tasks that are carried out at set mileage intervals.
For example, on a Fiat Ducato, the service interval is every 30,000 miles or once every two years, whichever comes first.
Other brands of van have similar intervals but these aren’t geared for motorhome use, where it’s common for vehicles to cover less than 10,000 miles per annum and often sitting unused for several weeks.
While some major issues should be picked up on the annual MoT test, items such as oil leaks, worn brakes or simple software updates for the ECU are unlikely to be.
We recommend changing your oil and filter once a year – if you do around 10,000 miles or less per year – and getting into the habit of keeping an eye on all the other servicing consumables while the bonnet is up.
You can read more articles on technical advice, from motorhome experts, in every issue of MMM magazine – buy digital editions here
Parts to use on your motorhome’s base vehicle
Once your base vehicle is out of warranty, you can save money by buying aftermarket parts from a range of suppliers. Many of these are as good as the genuine original equipment (OE) parts, but often cost a lot less.
Many are identical and are even made by the same manufacturer; for example, Textar, Brembo and ATE may not be brands you’ve heard of, but they supply many of the OE makers with brake pads.
So, do a little homework and get familiar with all the OE suppliers on your vehicle.
High-quality brands of oil filter include Fram, K&N, Mahle, Hengst and Bosch, while any engine oil brand that meets the specification detailed in your handbook will be fine.
Used motorhome base vehicle parts
There are many non-safety critical parts that you can source in a vehicle breaker’s yard. For example, if someone smashes one of your door mirrors, it’s easy enough to find a secondhand replacement for a fraction of the price of a new one.
There’s little point fitting a brand-new mirror to a 10-year-old Ducato – it won’t add anything to its resale value and is just money out of your pocket.
Equally, interior parts and items of external trim (such as a replacement grille or a side moulding) can easily be sourced in a breaker’s yard.
It’s also worth checking out the listings on eBay for parts. The drop in scrap values means there are some bargains out there, but be aware that there is little comeback on used parts bought privately on auction sites.
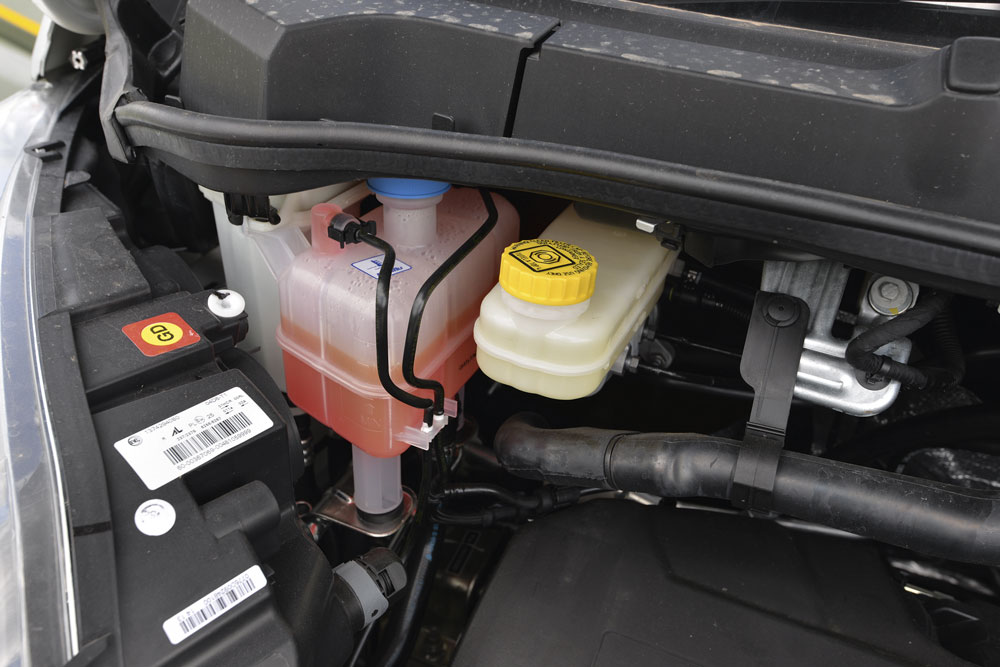
Topping up fluid levels
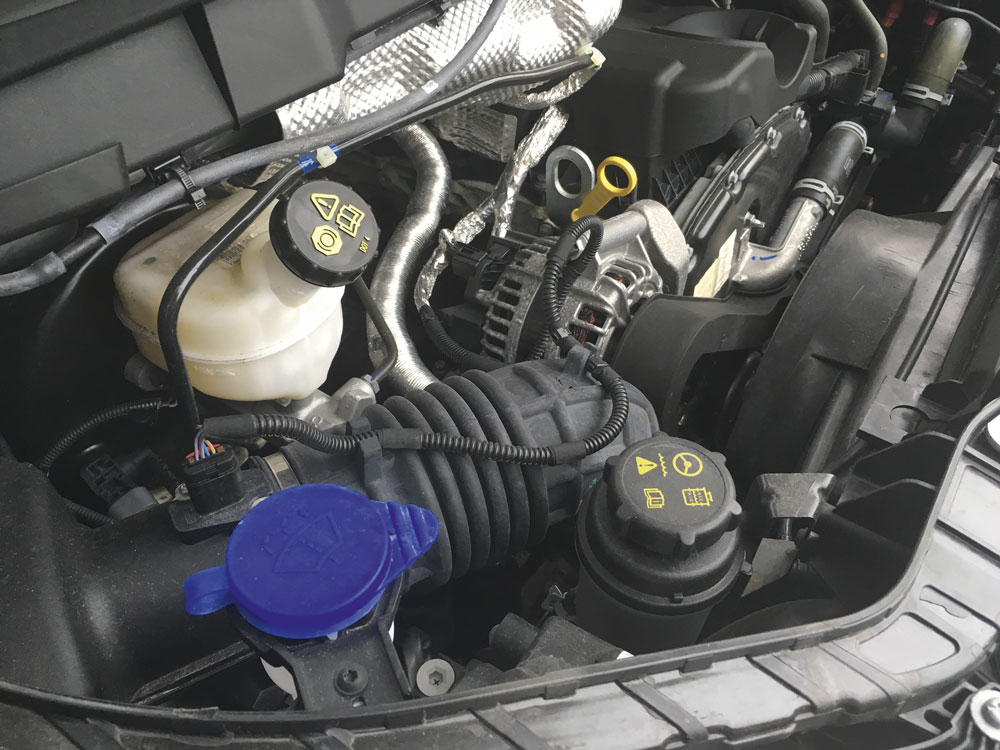
Keeping your vehicle’s fluids topped up will increase its longevity and the act of keeping a watchful eye on fluid levels also serves as an early warning indicator of any problems.
Engine oil and coolant are the two most important fluids to monitor regularly and it’s important to use the grade of oil recommended in your owner’s manual. The key things to look for are the oil’s grade (many Ducatos use 5W/30) and specification.
Modern multigrade oil is designed to have a certain viscosity when it is cold (with ‘5W’ – the ‘5’ is the oil’s resistance to flow and the ‘W’ is for winter) and another when it is up to operating temperature (the ‘30’ bit).
The viscosity of modern oil varies with temperature. Oil also has various blends of detergent in it to reduce carbon build-up in the engine and for temperature stability.
In the case of a Ducato, Fiat recommends Fiat 9.55535-S1 grade oil or ACEA C2 grade oil. ACEA is the acronym for the European automobile manufacturer’s association.
In this case it means that the oil is designed for vehicles with DPF filters, three-way catalysts and has set criteria for viscosity. Choose a brand of oil that has either of these two specifications written on the package – in the correct grade – and you will be using the correct oil.
Coolant (also called antifreeze and used in the cooling system) is equally important and also comes in various grades. It’s important to use the grade recommended in your owner’s manual (Fiat classification 9.55597 for a Ducato). Different types of coolant should not be mixed and it is colour-coded to make this obvious – if the coolant you’re planning to use is of a different colour to that in the vehicle, it’s probably the wrong type.
Most coolant is concentrated and needs to be mixed with distilled water in a certain ratio (Fiat suggests 50/50 for down to -35°C and up to 60% antifreeze for even colder weather). Always use distilled water and never tap water.
Happily, with brake fluid things are simpler and most Ducatos need to use Dot 4 specification fluid – this is widely available and cheap. It’s essential to change brake fluid every couple of years as the fluid absorbs moisture from the air over time and these water droplets can migrate to the wheel cylinders.
While water doesn’t compress, at the disc/pad face the temperatures can be in the hundreds of degrees so any water present will turn to steam, creating small bubbles in the fluid. This gives a spongy feel to the brakes.
The brake fluid level will normally drop slightly as the brake pads/shoes wear, but any large level drops or a level below the minimum markings on the reservoir needs urgent investigation.
Power steering fluid doesn’t often need topping up (if it does drop significantly the pump will start making grumbling noises) and any drops in level need investigating. Most Ducatos need to use ATF Dexron III, which is a widely available grade.
Air filter
After a basic fluid check and top-up, replacing an air filter is one of the easiest DIY jobs – they’re inexpensive to replace and you usually don’t need any tools at all.
These paper elements are normally housed in a rectangular or circular airbox, that is held together by a set of spring clips around the airbox. Unclip these to reveal the filter inside.
Rectangular airboxes usually house flat panel-style air filter elements, while the circular boxes house drum-shaped air filters. Both work in the same way – they filter out road dirt and debris to prevent it from entering the engine’s intake ducting.
Over time they get blocked and can reduce engine performance and efficiency. As they’re usually made from a pale-coloured fibrous paper material it’s easy to see when they need replacing as they get really grubby and discoloured.
It’s a good idea to regularly renew your air filter. You can also buy upgraded air filters that are designed to last the lifetime of the vehicle. These can work out cheaper in the long run if you plan to keep your vehicle for several years.
Oil and filter change on a motorhome
Buy the correct grade and specification of oil as detailed in your owner’s manual and also make sure you buy the right amount of oil. For example, the Ducato 130 Multijet needs 5.9 litres of oil, while the 180 Multijet needs nine litres.
The trick to changing the oil is to run the vehicle up to operating temperature before unscrewing the drain plug into a large oil drain pan – it flows better when warm. Wear gloves and wait until the sump plug is cool enough to touch before removing it. And stay out of the way of the stream of oil!
While all the oil is draining, you can tackle the oil filter change. These come in two types – screw-on metal canisters that attach to an outlet on the engine, or the cartridge-type where a replaceable filter lives inside a plastic or metal tub (which usually has an unscrewable top that needs a specific size of spanner).
On early Ducatos it’s a simple screw-on canister at the front of the engine and getting to it couldn’t be easier – it’s a two-minute job.
If possible, prefill the oil cartridge with fresh oil and – in the case of a spin-on canister – smear a little oil on the rubber seal before fitting it.
Pour in the fresh oil to the correct level on the dipstick. Then start the engine and let it idle for a minute. Recheck the oil and top up again – the level will have dropped as the oil galleries, coolers and the filter refills with oil. Once you’ve finished the oil and filter change, pour your old engine oil into an oil tub and recycle it at your local refuse centre. It will also recycle the oil filter.
Fuel filter
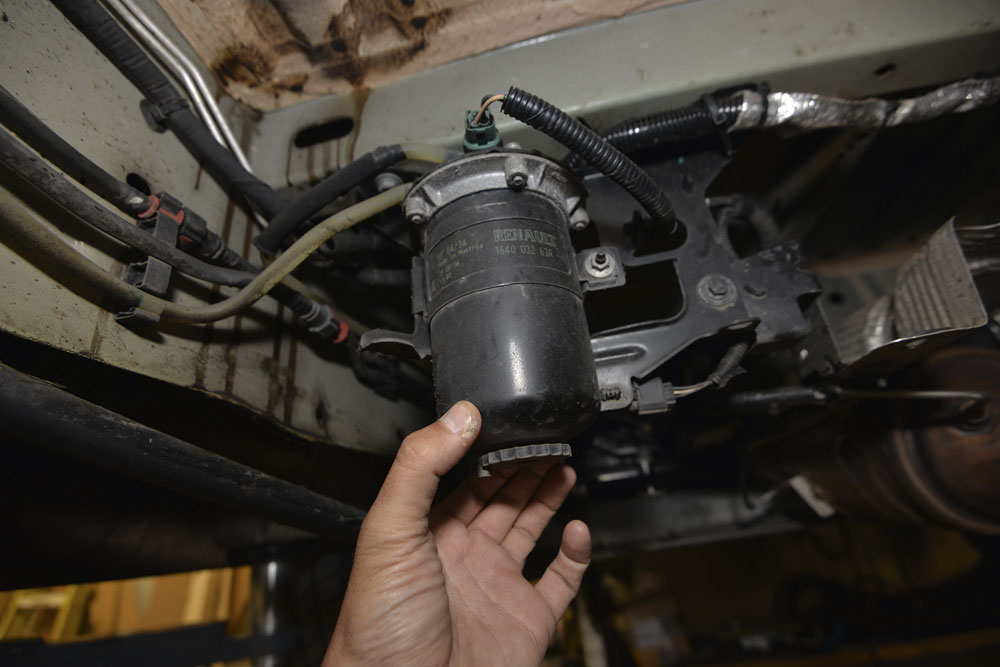
Diesel engine fuel filters need to be drained regularly and changed at least every couple of years (and at least checked annually). Compared to petrol, diesel has more propensity to hold water in suspension – a problem that is aggravated if you leave the tank partially filled for long periods, making the air volume inside the tank more prone to condensation.
The filters are fitted on the fuel lines and are mounted upright so that the water falls to the bottom of the filter. They often have a tap at their base to allow water to be drained off.
Some models of Ducato are prone to leaking if a replacement filter is fitted so many experts recommend replacing the entire filter and filter head when it needs changing. You can buy aftermarket UFI filters and housings from £70 online for a Ducato. Most have push-on plastic fuel pipes and are easy to remove and replace.
Pollen filter
If you suffer from hayfever, then replacing the pollen filter will be a must for you as it significantly reduces the level of pollen inside the vehicle.
Pollen filters are generally found around the scuttle intake area on a van and the ease of replacement depends on how enthusiastically the base vehicle maker has surrounded it with plastic components.
On the current generation of Ducato the pollen filter is located behind a couple of plastic panels in the centre console of the dash that are held in place with a series of screws and clips – it takes about half an hour to replace.
On vehicles where they’re fiddly to replace it’s tempting to not bother but remember that bugs are prone to living in them if left unchanged.
Light bulbs
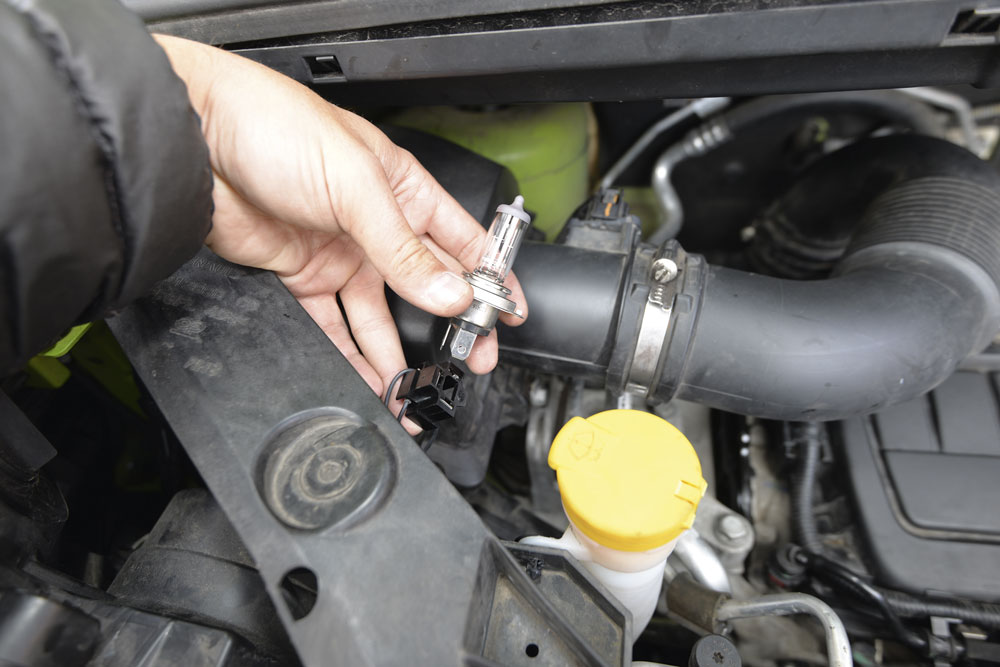
While firms like Halfords will replace your light bulbs for a fee (as will your dealer), it’s useful to know how to replace them yourself.
Replacing halogen headlight bulbs on most base vehicles is easy and can be mainly done without having to remove the headlight.
Replacing blown bulbs in the taillights is generally easy on most panel van conversions, but on coachbuilts and A-class models it all depends which type of light cluster has been used – some are as simple as removing a couple of exterior screws, while others are more involved.
Brake pads and discs
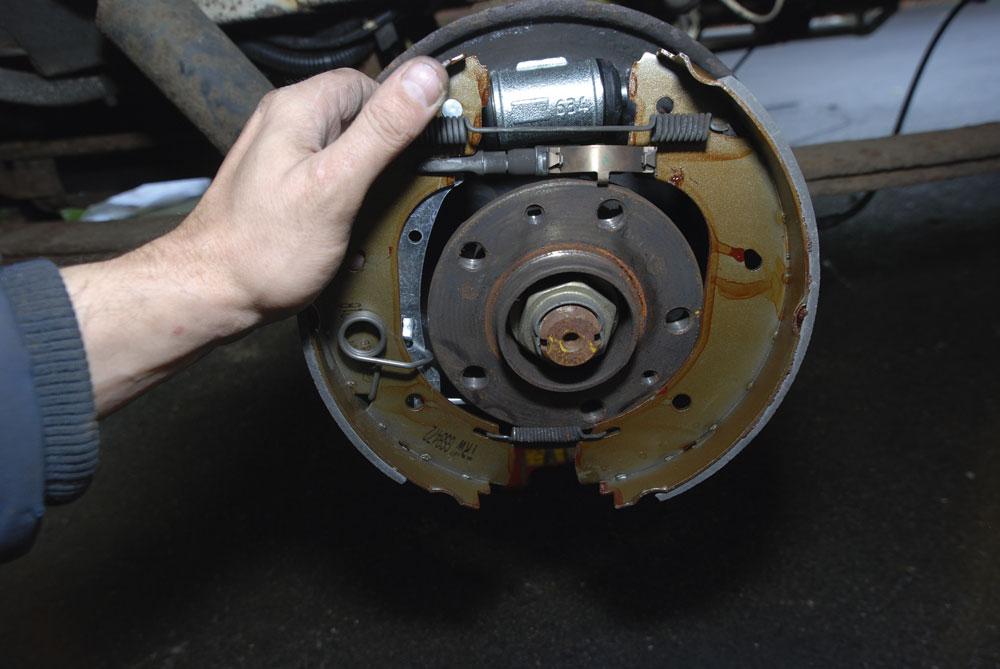
It might seem odd to suggest fitting your own brake pads and discs, but it’s actually a simple DIY task. Fitting a set of brake pads can often be done in under an hour. You don’t need to add any brake fluid and the only tricky bit is pushing the pistons back into the calipers (you can use water pump pliers or one of the various inexpensive tools available).
Changing discs can be equally easy – they will need doing if they’re too thin or if a pronounced lip/excessive rust is present – depending on which base vehicle you have.
It’s pretty easy to change discs on a Ducato as they sit on the outer edge of the hub, while on a FWD Transit they’re a pain as they sit behind the hub assembly and you have to remove the incredibly tight hub nut and unbolt four tight screws before you can remove them.
You will need a trolley jack and some axle stands before you tackle this job, though. For a 3,500kg motorhome, three-tonne axle stands are fine (they hold three tonnes each, so a pair holds six tonnes) and a two-tonne trolley jack is fine (you’re only lifting up one corner at a time, so the loading probably won’t even be one tonne).
If you need a brake fluid change, we suggest you get a garage to do it – they have air-powered bleeding kits that are more efficient than DIY kits and the procedure does require more skill and knowledge than a brake pad swap


