


Motorhome advice: Looking after your cassette toilet
Words and photos: Barry Norris
Freedom is what appeals to most motorhomers, so it’s worth looking after one of your most valuable freedom assets: the cassette toilet.
With regular maintenance, your cassette toilet will keep going year after year, providing you with a convenient sanitary facility.
The cassette toilet first appeared as the Porta Potti in the 1960s, which provided a detachable waste holding tank (the cassette) below the toilet bowl.
This cassette could be hygienically sealed off, yet be easily taken to a disposal point. In the 1980s, Thetford introduced a fixed internal bench cassette toilet for caravans with cassette removal through an external hatch door.
For campervans, the Porti Potti-style cassette toilet is still an ideal unit. For motorhomes the fixed installation concept is now the preferred option, but with electrical facilities replacing mechanical hand pumps and waste level indicators.
Later developments have seen domestic-type swivel bowl units rather than bench fittings, wheeled cassettes and flushing from the freshwater tank.
Recently, ceramic bowls have been introduced, but at a cost of an extra 9kg weight. Also read the feature in this issue on the new Thetford system, which banishes the cassette entirely.
Much of the following refers to Thetford cassettes but it also generally relates to Dometic products. It’s always worth referring to your manual for specific advice.
Cleaning a cassette toilet
 Regular cleaning of the toilet bowl and cassette is essential to maintain the system in a hygienic and sweet-smelling condition. The big mistake newcomers often make is using domestic cleaning products, which can damage the plastic mouldings and rubber seals that keep the waste and smells within the holding tank.
Use only products made by the cassette manufacturer – such as Thetford’s Bathroom Cleaner – or products specifically for cassette toilets made by reputable companies.
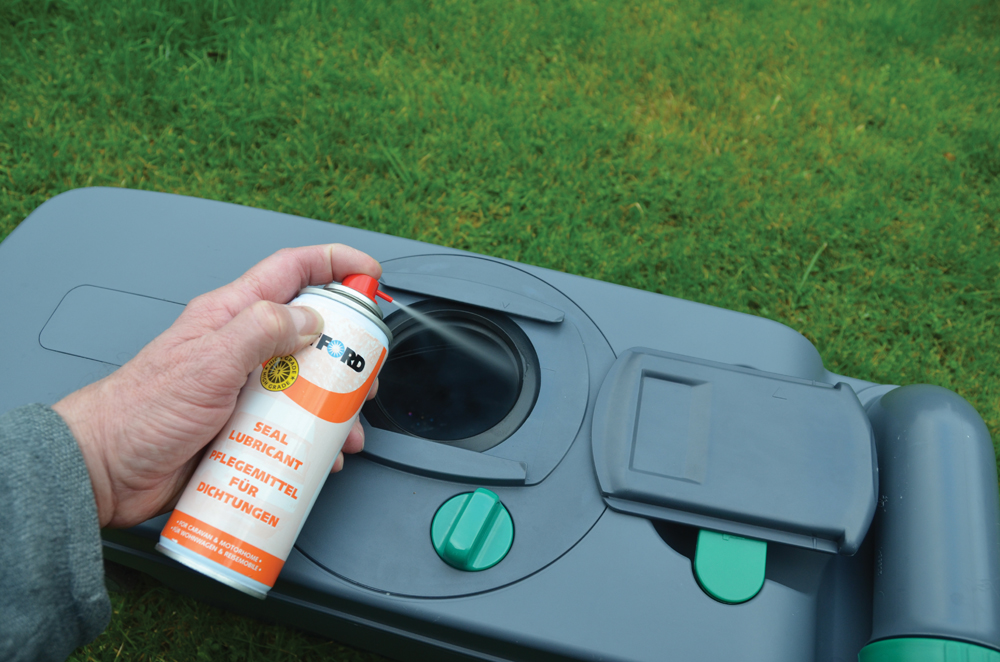
The waste holding tank will tend to scale and slime up over time, hence a good soak overnight with proprietary waste tank cleaner solution will keep it clean and odour free. Spray Thetford’s silicone lubricant onto the rubber lip, vent and pressure relief seals plus the slider cover after cleaning the tank, but never use Vaseline or vegetable oils. Do this two to three times a year.
Cassette toilet winter maintenance
As soon as frosty weather approaches ensure your flush and waste tanks are emptied. After draining, always press the flush button a few times to clear the pump of residual water to avoid frost damage. Leave the valve blade open to ventilate the tank and prevent the blade sticking. If you camp in winter, ensure there is heating in and around the toilet location when icy conditions are anticipated.
Cassette toilet fluids
Toilet fluids are available for the waste holding tank and for the top flushing tank – generally pink fluids for the flushing tank and blue or green fluids for the waste tank. Products like Fenwicks Top & Tail toilet fluid are suitable for both tanks.
A huge number of products are available for the toilet waste tank, but not all are the same or as effective. Providing you keep your toilet clean and well maintained your nose should tell you whether the new bargain toilet fluid was a good buy. Correctly dosed, I expect my cassette tank to be odour-free for three to four days.
Fluids for the waste tank are intended to mask or minimise odours and help liquidise the waste.
Traditionally, blue fluid used formaldehyde as the main active ingredient but, because of environmental concerns, many use a different biocide. Green-coloured fluid indicates it is more environmently friendly. Some of these do not perform as well as blue products, particularly in very cold or hot weather.
Do comply with any request by campsite owners to use green toilet fluids. Sites that use septic tanks or small on-site sewage treatment plants are especially vulnerable from chemical fluids, which kill the good bacteria that break down the waste.
Whatever the fluid, only pour it into the cassette via the discharge spout. Pouring concentrated fluid into the tank through the main opening from the bowl is liable to damage the rubber lip seal.
It’s worth using an additive like Thetford’s Aqua Rinse in your flushing tank or Aqua Rinse Spray direct to the bowl to keep the bowl clean and smelling fresh. Both products tend to permit greater slippage on the bowl surface, thus reducing smears.
The SOG alternative
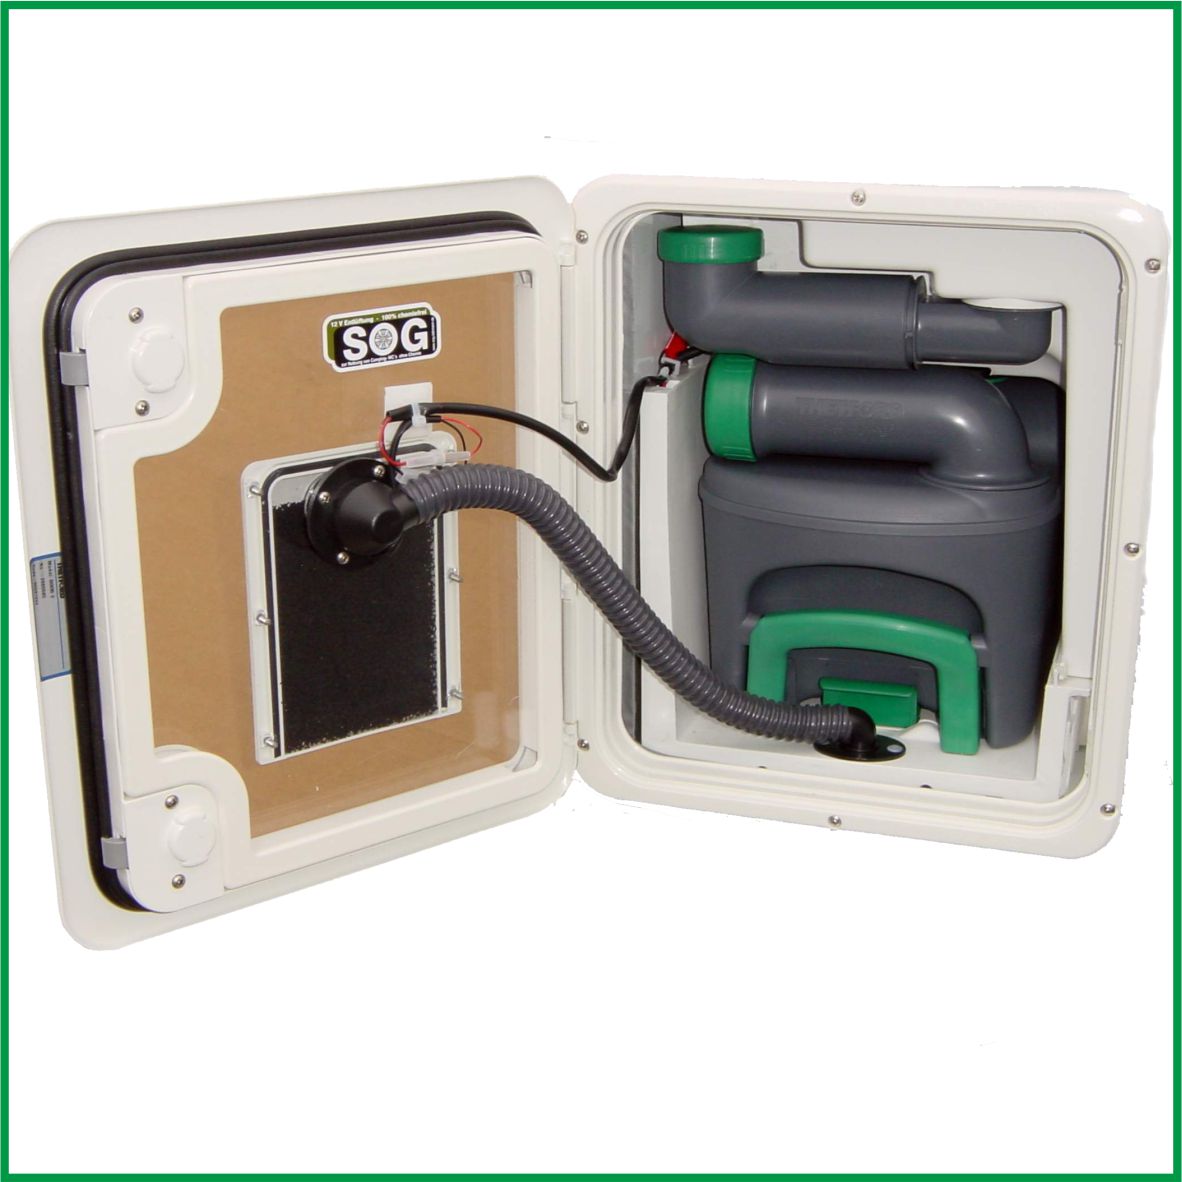
SOG is a proprietary system replacing chemicals by adapting existing cassettes with a 12V extraction system to push out odours from the cassette into the open via a charcoal filter.
On opening a toilet bowl blade, an extractor fan operates, sucking air into the cassette to encourage breakdown of waste and preventing smells getting into the washroom. However, when emptying a cassette it’s a bit whiffy as there are no chemicals.
It’s a personal choice but you need to use many bottles of toilet fluid before you see a return on the investment of around £180 (plus fitting) and £14 for the annual filter change.
Toilet paper for cassette toilets
Special toilet paper that dissolves more readily than domestic toilet paper is available for cassette toilets. This makes for easier emptying and helps prevent clogging. Only ever put bodily waste and toilet paper into your cassette as the cotton buds and wet wipes may clog your cassette and certainly disrupt, if not damage, sewage disposal systems.
Emptying a cassette toilet
![]() Only empty your cassette at a designated disposal point, which will be labelled as chemical disposal point (CDP), Elsan disposal point or even sluice room.
Only empty your cassette at a designated disposal point, which will be labelled as chemical disposal point (CDP), Elsan disposal point or even sluice room.
Three essential pieces of advice at the disposal point are:
- Always put the cassette cap on the floor. If it is on an adjacent wall or shelf, sooner or later, it will get knocked into the disposal bowl
- Always press the vent button when emptying to avoid unpleasant discharge splutter and splashes
- Always keep upwind of your cassette at an outside disposal point.
Thetford recommends emptying the waste tank before travelling if the tank is over three-quarters full. Most cassettes have a pressure-relief valve, which can also allow liquid waste to escape during vigorous motion unless the waste level is low. Similarly, if you have a separate flushing tank, then keep the level low when travelling.
Emptying the cassette is simply a task requiring strict observance of hygiene procedures. Never smoke or eat or touch your face during proceedings and thoroughly wash your hands after. It’s better to wear gloves, preferably disposable gloves.
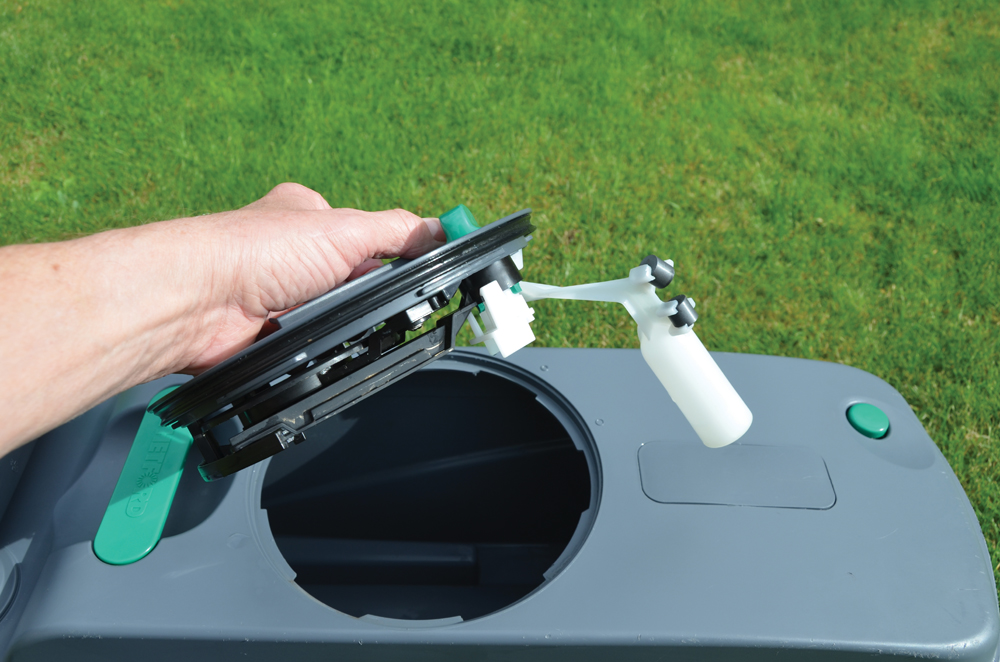
The lip seal
 When the blade at the top of the cassette is closed against the lip seal, smells cannot enter into the washroom. The seal’s upper side provides a seal against the cassette housing to ensure liquid waste only drains into the cassette from the bowl.
Regular use of silicone spray should keep the lip seal in good condition and Thetford recommends replacing the lip seal every four to six years.
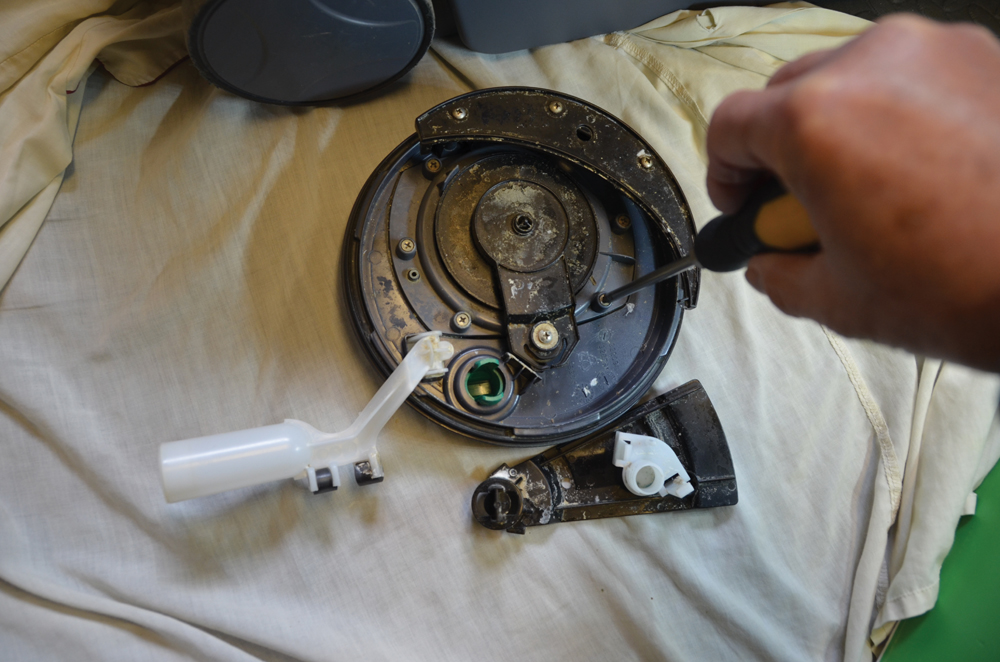
Changing a seal on older models just requires removing around eight screws. On newer models, remove the access plate and then some dismantling of the blade mechanism is needed before the seal can be replaced.
Potential cassette toilet problems
 Spares are readily available, particularly for Thetford products. Cassettes since the C2, C3 and C4 models have incorporated a large bayonet-style opening aperture into the tank interior. This gives access to the lip seal, float arm and blade mechanism and eases the replacement of other components.
The removal of the access cover is achievable by using the slide cover to turn it around. If it’s particularly hard to move, try a piece of timber cut to form a snug fit to get better leverage but take care not to stress one corner of the slider cover runner.
When replacing seals, a lip seal costs around £12. Alternatively, you can replace the aperture cover, complete with blade mechanism, lip seal and, in some cases, the level indicator arm for around £40.
MMM July issue ran a step-by-step guide to giving the cassette toilet a service. Buy a digital copy here.
If other seals on the vent button and pressure-relief valve need replacing, consider Thetford’s fresh-up sets for around £100. These contain a cassette tank, plus new seat and cover at less than the cost of a new cassette.
When cleaning and rinsing out the waste tank, only shake gently or you may dislodge essential parts.
Level indication failures can sometimes be due to a build up of toilet paper on the float arm.
Electrically operated controls can be vulnerable to moisture damage, such as phantom operation of the flush pump, so it’s worth switching off the appropriate electrical circuit before leaving your ’van.
Flushing tanks sometimes suffer from the presence of black bits caused by not completely draining down the tank prior to a long lay-up. Thetford recommends using a weak solution (100ml to 10 litres of water) of household bleach.
Fill the flushing tank with the bleach solution and, after 24 hours, drain the tank and refill with clean water and drain. Then repeat the clean water fill and drain to ensure no trace of bleach is left.
Cassette toilets – top tips
- For a thorough clean, most toilet lids and seats are easily removed
- Intermittently press the flush button to create the most efficient flushing effect. A few of Thetford’s latest cassette toilets have an automatic pulse flushing action
- After emptying a cassette add around three litres of water and this will enable the toilet fluid to do its job better and help prevent 'pyramiding' where the waste drops into your tank
- Practise the paper lotus technique for keeping the bowl clean with a cross of toilet paper over the blade opening before performing. This should see your No 2 automatically packaged up before dropping into the waste tank

Recent Updates
Where and how to sell my motorhome: the ultimate guide
Whatever your reason for selling, there are a number of steps to take to try to get the best price for your motorhome or campervan
Gas tanks or refillable cylinders: our guide to motorhome gas
From cooking dinner to the central heating, gas is an essential feature of motorhoming – here, we explore ...
Engine management lights: all you need to know
What is the engine management light? What does it mean, and what do I have to do? ...
Motorhome air suspension: all you need to know
Motorhomes are heavy and the additional weight of equipment and height of the bodywork can increase the loads ...
Motorhome WiFi: how to get better motorhome internet
Staying connected on the move is more and more essential, so relying on campsite WiFi isn't an option – here ...
A class of their own - our guide to A-class motorhomes
Thinking of trading up to an A-class, or even going straight to the top of the motorhome tree? We guide you ...
Explore overseas on a motorhome dream tour
Enjoy exotic travel in a campervan or motorhome by hiring, swapping with someone else or exporting your ...
Motorhome water systems: everything you need to know
On-board water is an important part of every motorhome – here’s everything you need to know ...
Campervanning in Europe: what you need to know
Whether you're planning a leisurely drive through the French countryside, navigating bustling city streets in ...
Campervan security: all you need to know
With thefts on the increase, it’s important to know how to keep your campervan secure and prevent campervan ...
Other Articles
Campervan furniture: everything you need to know
Our campervan experts guide you through all the essentials for your campervan, including tables, chairs, inflatable seating, windbreaks and ...
Campervan finance: how to fund your purchase
Here we look at the different types of campervan finance available, to help you decide what’s the best option ...
Britain’s best used motorhomes
Want a great motorhome without paying the premium for a new one? Here's a guide to the best you can get in ...
Which motorhome? Choosing the perfect motorhome for you
Choosing a motorhome or campervan is one of the biggest buying decisions you’ll ever make, so it's important ...
Campervan washroom essentials: stay fresh on the road
Our guide will take you through the campervan washroom essentials you'll need so you're well-prepared for ...
Dogs in campervans: all you need to know
Follow our advice and your dog will enjoy campervanning as much as you do ...
Electric campervans: all you need to know
Our guide will take you through everything you need to know about electric campervans and what the future ...
Motorhome electrics: a complete guide to your motorhome electrical set-up
Motorhome electrics can dramatically enhance the convenience and comfort of your vehicle – but they can be ...
Lighting for campervans: all you need to know
We guide you through all the lighting options available for you and your campervan, including interior ...
Electric bikes for motorhomes: our ultimate guide
Read our comprehensive guide to electric bikes for motorhome owners, helping you add electric power to your ...